Duct Bank Concrete
Opens the Duct Bank Concrete Generator where you define specific dimensional properties for the concrete placed around a duct bank.
When generating concrete around the existing duct bank, you are first prompted to select the starting and ending segment of the duct bank run.
Note: If conduits have any
disconnect along the path or if they are overlapping,
OpenPlant Modeler
concrete generation tool will detect that issue and highlight
those conduits. You will need to manually investigate the issue with the
selected conduit(s).
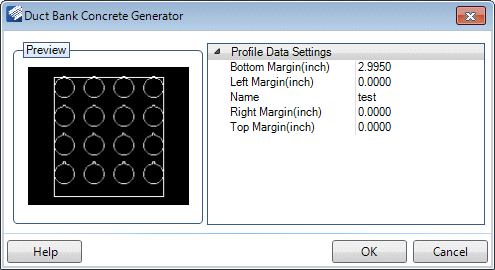
The Profile Data Settings are entered directly into the provided fields:
| Setting | Description |
|---|---|
| Preview | The preview section will display a visual image of how the concrete is layed out around the duct bank. It will change dynamically as you change the values in the property fields. |
| Bottom Margin | The bottom margin is usually predefined using the dimension of the base spacers used when the duct bank was routed. While this value can be changed, it usually is not necessary to do so. |
| Left Margin | Defines the distance between the left inner wall of the concrete and the left edge of the duct bank arrangement. |
| Name | Defines a tag name for the duct bank run. |
| Right Margin | Defines the distance between the right inner wall of the concrete and the right edge of the duct bank arrangement. |
| Top Margin | Defines the distance between the top of the concrete enclosure and the top of the duct bank arrangement. |
| OK | Applies the values for the concrete enclosure and will automatically draw the concrete for the selected duct bank. |
| Cancel | Cancels the command and closes the dialog. |
Once you have defined the Data Settings, click OK to place the concrete.
The concrete is represented by a red bounding box around the duct bank as shown below:
